One day you’re innocently going about your business – next thing you know, you’re standing in a supermarket subconsciously humming The Little Drummer Boy in November, wondering how it came to this. Christmas creeps up slowly at first, with a few benign bits of green and red dotting the aisles. Then, seemingly overnight, they undergo some kind of festive mitoses, invading every physical space and corner of your mind. Where did these festive customs come from? Here’s some research: I read it on the internet, so it must be true…
FUN CHRISTMAS FACTS ACCORDING TO THE INTERNET
FACT 1: The first Christmas Cards were printed in 1843, as a “time-saving device”…
… then Facebook came to save us all. Back In My Day, people used to save last year’s Christmas Cards and their envelopes, make a list of recipients, handwrite all the greetings and addresses, lick hundreds of disgusting flavoured envelope sealers, line up for stamps for eternity, post the batch, then try to string all the received cards up around the living room. There were even special mini-pegs manufactured for this purpose. Yes, this was a thing. And just when you thought you were done, there was a fresh wave of Christmas Cards in the letterbox that need reciprocating. Now thanks to Facebook and the Send All function, it’s so easy to send festive platitudes to people you never see with the effort of a mouse click. Booyah.
As an aside, when writing cards as a kid did anyone else sort them from prettiest to ugliest? So the awesome ones went to your besties and the crap one to that mean girl who put glue and glitter on the seat of your chair so you had glitter-butt?

Sweet Dreams, MacKenzie
FACT 2: The Cracker or Bonbon was invented in the 1840s by a pastry chef…
…then the humble Bonbon got tricked-out with novelty toys, bad jokes and silver fulminate, because nothing says Christmas like explosives. The largest functioning Christmas Cracker was a whopping 45.72 metres long, and made right here in Australia. Imagine how many terrible puns were contained inside? What do you call a reindeer with no eyes? No idea. What do you call a reindeer with no eyes and no legs? Still no idea. *groan*. Here are some highly sought-after prizes from our Christmas Crackers in 2006:
-


- A. Hula Lady Dancing, in Nonna’s Pasta Fazool. B. Fortune telling cellophane fish. Hands off, they’re mine!
Fact 3: There are at least 36 different Christmas Trees listed on Wikipedia
But my $15 Kmart plastic tree isn’t there. Nor is the origami-inspired tree folded from a magazine that we made as Girl Guides. Or gingerbread trees. If I had the choice between a delicious edible tree or one that I was constantly sweeping up pine needles, I know what I’d choose.
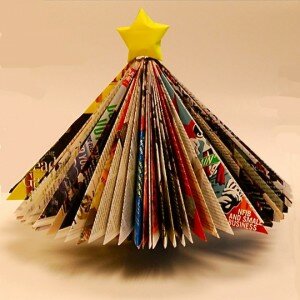
This earns the 'You Have Way Too Much Spare Time' badge at Girl Guides.
If you’re into giving gifts a bit fancier than cellophane fish, handmade gifts are a nice touch. Bonus points if you can eat them. Last year I packaged my homemade Fruit Mince Pies, which were well-received among co-workers. Completely delicious, they were however quite fiddly to assemble, and not kid-friendly. These Gingerbread Christmas Trees on the other hand hold much promise in the fun-department: rolling, cutting shapes, dunking in icing, sprinkling silver balls everywhere. Lots of opportunities for little fingers to get messy.
This gingerbread recipe is different from the one I used to construct a Gingerbread House, in that it’s softer and more flavoursome. Adapted from the wizards of the Bourke Street Bakery cookbook, Perfect for cutting different shapes, including Ninjabread Men, for a totally kickass Christmas.
GINGERBREAD CHRISTMAS TREES
Makes at least 24 Gingerbread People or Trees
You Will Need:
615g Plain Flour
Pinch Salt
1/2 teaspoon Bicarb Soda
7.5g Ground Ginger
5g Ground Cinnamon
5g Ground Nutmeg
200g Unsalted Butter, room temperature
200g Brown Sugar
160g Honey or Golden Syrup (microwave slightly to soften honey)
1/2 Egg
2 Egg Yolks
Decorations:
Whatever you like to decorate your tree e.g. multicoloured cachous, yellow fondant stars
Directions:
Beat softened butter, sugar and honey/golden syrup in a large bowl until thick, pale and creamy. Mix the eggs together in a small bowl, then slowly beat them into to mixture until all combined. Add in the salt, bicarb, ginger, cinnamon and nutmeg. Stir in the flour in three batches until evenly mixed through the dough. Be careful not to overwork the dough. Shape the dough into two flat discs, wrap in clingfilm and refrigerate for at least 20 minutes (can keep in the fridge for up to 3 days).
Preheat the oven to 170C (150 fan-forced). Line a large baking tray with baking paper. Remove dough from fridge. Knead to soften slightly if still firm. Roll lumps of dough between two sheets of baking paper to about 3mm thick. Cut out the shapes using a cookie cutter and space 1cm apart on the baking tray. Reroll the leftover dough and continue cutting shapes from it.
Bake for approximately 15 minutes, or until golden in colour. It might be tricky to tell, given the colour of the dough. With my Christmas trees the edges of the branches started to turn a darker brown colour. Check underneath the cookie for a rich golden brown colour. Leave to cool on the tray for a few minutes, then transfer to a wire rack to cool.
EDIT: 9th December 2012.
Ok, there are two ways to ice the trees depending on how confident you are with piping.
Technique 1: Easiest (as pictured above)
Royal Icing
315g Icing Sugar
2 Egg Whites
Green liquid food colouring
To make the royal icing, mix the icing sugar and egg whites together until smooth. Add food colouring to get the desired green colour. Pour into a shallow bowl. To decorate the cookies, dip the top surface into the royal icing, wiggle the cookie, lift up and shake off the excess. Use a spatula to smooth off any excess. While still wet, sprinkle cachous on the top. The icing will harden as it dries, so make sure you coat and decorate one cookie at a time.
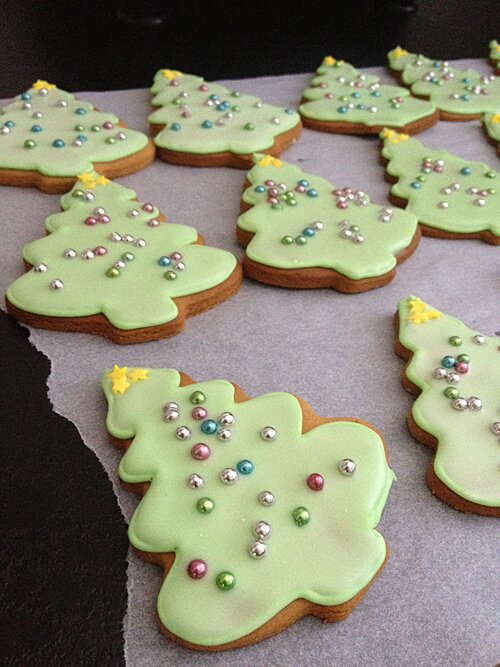
Technique 2: Outlining then flooding the cookie (harder, but a neater finish, see picture below)
You Will Need
One batch of green tinted royal icing made as above using 315 g icing sugar (flooding)
One batch of green tinted royal icing made as above using 375 g icing sugar (outlining)
Piping bag with small round nozzle (around 5mm)
Piping bag with larger round nozzle (around 15mm)
Small Metal spatula
Fill the piping bag with the 5mm nozzle with the thicker (375g) icing. Carefully pipe a thin outline of the Christmas tree to make a neat border. It might take a few practice cookies to get into the groove of things, so start with your worse or spare cookies. is good for watching the piping technique.
Once the border is dry, fill the other piping bag with the 15mm nozzle with the thinner (315g) icing. One cookie at a time, fill the middle of the cookie with the icing, then use the spatula to help spread the icing into the corners so the cookie is evenly coated. Decorate immediately before moving on to the next cookie.
Can be store in an airtight container for 2 weeks.
 Bourke Street Bakery Cookbook available from the Book Depository, or Bourke Street Bakery at Fishpond AU. 100% of sales commission donated to food-related Charity.


